Within CloudJiffy, you can move any environment that you own to another CloudJiffy account through environment transferring.
Environment transferring allows you to move any environment to another Cloudjiffy account within the same platform (confirmation on both sides is required).
Reasons
The feature can be beneficial in many cases. For example, if you need to :
- move all your projects to a new account, registered with a different email address.
- transfer your work projects to another developer's account in case of an employee leaving the company
- move a production-ready environment to the main company account from the personal testing one
- restore environments at the old deactivated account without its reactivation
Tip : Also, service hosting providers can offer a service of creating the required application for you. After configuraiton and testing, the production-ready environment will be transferred to your account.
Conditions
Any environment (stopped/running) can be transferred from any account (including deactivated ones). However, a target account should meet the following requirements:
- type - can be of any type (beta, billing), except trial accounts
- status - should be active (i.e. not suspended or deactivated)
- quotas - should have sufficient quotas (limitations) to add the environment
Note: On the platforms before the 5.9.3 version, environments can be transferred to the billing accounts only.
For example, some quotas checked during the transfer: cloudlets per container, nodes per environment, environments on account, public IP / VPS / high-availability features (if they are enabled in the transferred environment),etc.
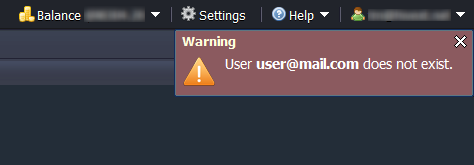
Also, in case of an error, you'll see the corresponding notificaiton directly at the dashboard:
Result
No changes are applied to the environment after transferring. The new owner receives it in the same state, with the same applications deployed, and with the same custom configurations. All the consequent charges for the environment will be applied to the new owner as well.
Also, the transferred environment becomes unshared from all the users that had access to it.
Transferring Steps
- Click Settings button next to the desired environment.

2. In the opened tab, navigate to the Change Owner section and enter the email address of a target user (potential new environment’s owner).

Click the Send Request button to proceed.
3. If a target account exists and meets all the requirements, you will see a notification that the request has been sent.![]()
4. The specified user will receive a request for an environment transfer with a confirmation URL via email.
Note : While waiting for a new owner’s confirmation, the environment is marked with a custom icon  at the initial owner’s dashboard.
![]()
5. In the case you would like to cancel a still unconfirmed transfer request you’ve initiated, navigate to the same Settings > Change Owner section and click Cancel Request button.![]()
Press Yes in the appeared confirmation window.![]()
6. When the target user confirms the transfer request (clicks a link from the email), the environment is removed from the initial user’s dashboard and appears for a new owner. Email notification about successful transfer will be sent to the initial owner.
It’s that simple. Using this method, you can transfer your environments to the required accounts.