Maven is a build automation and software comprehension tool, which is primarily used for Java programming. With Cloudjiffy PaaS I can add any public or private project directly from the version control system (VCS) repository using the appropriate link type: http, https or svn for SVN and git, http, https or ftp for Git. After addition, Java projects can be deployed to the appropriate application servers using the Maven build node.
Now, l can add private or public Java application from a remote VCS repository directly to the Maven node and deploy this project to my Cloudjiffy environment.
Add Project to Maven
I can add Java project directly to the Maven build node.
1. Select the Add project button next to the Maven layer, node or the Projects line underneath:

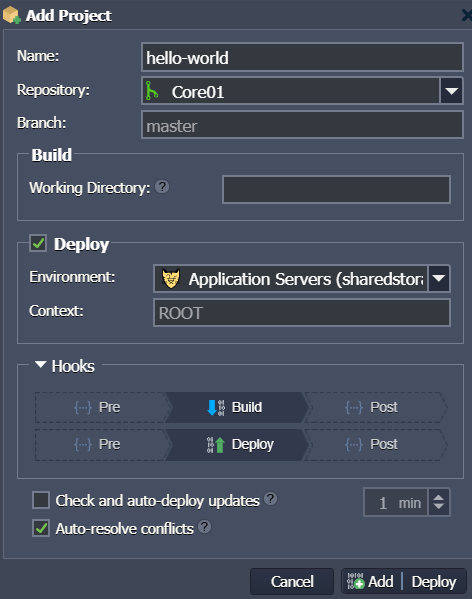
2. In the opened dialog box, I need to fill in the required fields:
- Name - sets a name for my project (no spaces and special symbols are allowed)
- Repository - allows to select the Git / SVN project from Deployment Manager (or jump to its addition form)
- Branch - defines the used repository branch (master by default)
- Working Directory (optional) - provides relative path to the repository subdirectory with application source code
- Deploy - chooses whether project should be just build on the Maven node (if unticked) or build and immediately deployed (if ticked); herewith, the letter option requires to fill into two additional fields:
- Environment - selects a target environment with the application server (is automatically selected, when installing from application server)
- Context - sets the desired custom context for the project (ROOT by default)
- Hooks - applies the provided scripts either before or after build / deployment processes
- Check and auto-deploy updates - enables periodical check ups for code changes in my repository (with configurable frequency); if any, project automatic deployment is initiated
- Auto-resolve conflicts - prevents the occurrence of merge conflicts by updating the contradictory files to the repository version (i.e. locally made changes are discarded)
Tip: If initiating deployment from a Java application server, I may need to set some additional options:
- Build - allows to select the existing Maven build node or add one into the target environment
- Deploy Strategy (for deployments into scaled server) - allows to choose between relatively quicker Simultaneous deployment variant, which causes a brief downtime, and the Sequential deployment with delay option to perform deployment on servers one-by-one with a set delay between operations, which ensures application uptime
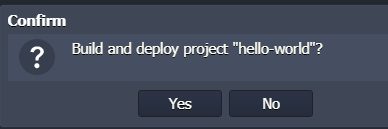
Finally, select Add or Add + Build (Add + Deploy) at the bottom of the frame. The first option will just save the provided data as a project template (i.e. without performing any actual actions), allowing to easily execute build and deploy operations in a future.
3. Now, my project will appear in the Maven node Projects list. Here, upon hovering over and clicking the appropriate button, I can call the following actions:
-
Build - downloads project from repository to Maven node (only if there were some changes since the last build) and prepares it for deployment
Tip: The project created with this option can be automatically uploaded to the Deployment Manager as archive by ticking the Upload builds to Deployment Manager checkbox.
-
-
Build and Deploy - checks for changes and deploys project into the target environment (allows to choose between the Simultaneous deployment and Sequential deployment with delay options, if deploying into scaled server)
-
Edit project - opens a form to edit data specified in the project addition frame described in the previous step
-
Config - opens the build project folder within the configuration file manager
-
Log - opens the Log section for issues troubleshooting and analysis
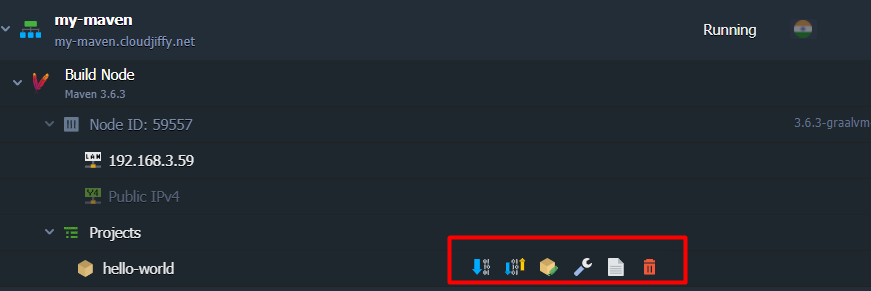
Delete - removes this project from Maven.
These are GUI options available for Maven build node management.