As you know Cloudjiffy Platform can build apps right in the cloud instead of building them locally and uploading WAR archives.
- This is much faster and takes less traffic.
- Packages can be huge and need to be re-uploaded every time you put some corrections into your code.
- Cloudjiffy can take only your code changes from the version control repository and rebuild the application in the cloud.
- In such a way you get the efficiency of the cloud and can use your computer without any extra load.
If you used to work with Bitbucket hosting service for projects, no problems! Today we'll show you how to create the highly available cluster in the cloud and deploy your code right from Bitbucket in a few minutes. Firstly, let's examine what Bitbucket is in brief.
Bitbucket is a distributed version control system (DVCS) code hosting site that supports Mercurial and Git. With these services, your data is distributed by definition but you still need a place to share it and keep track of your development. That is where Bitbucket DVCS comes in. Bitbucket provides a fully-featured environment for managing your development project, including a code repository, a wiki, a powerful issue tracker and easy collaboration with others.
Follow this instruction to add your Bitbucket project to Cloudjiffy.
If I used to work with Bitbucket hosting service for projects, which use the Git revision control systems, follow this instruction to add my project to Cloudjiffy.
1. Log in to your cloudjiffy account
2. While in the Cloudjiffy dashboard, click the Create Environment button:
3. Pick your application server and select the Maven building tool. Then specify the number of cloudlets, type your environment name, for example, bitbucket, and click Create.

Get the Repository Link
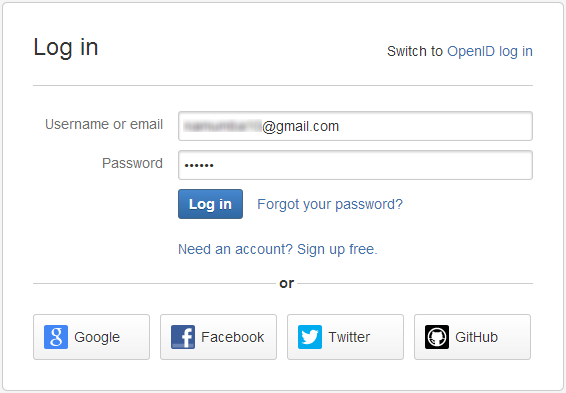
Navigate to Bitbucket's official web-site and log in to the system.
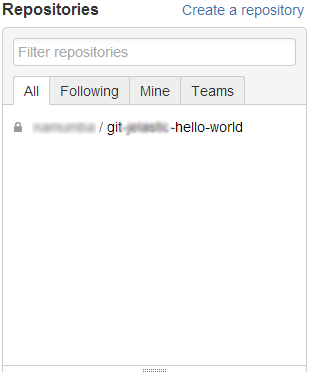
Click on the desired repository in the Repositories list.
Here you get the link to my project - just copy it from the following window:
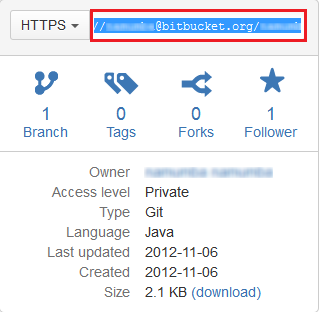
You have got the https:// link of the following kind:
https://{USER_NAME}@bitbucket.org/{USER_NAME}/{PROJECT_NAME}.git
Delete {USER_NAME}@ part of the link to get such URL:
https://bitbucket.org/{USER_NAME}/{PROJECT_NAME}.git
Now all is ready for adding my project to the Cloudjiffy cloud.
Add the Project
Click the Add project button next to the Maven node in my environment.

In the Add Project dialog box, write the name and then select the Repository.
If you have a new repository then click on "Add New Repository"

Now, just click on the Build and Deploy button and enjoy. That's all you have to do!

Update the Project
If you have performed some changes in my code and want them to be applied to the project in Cloudjiffy, click the Build and Deploy button next to the project in your environment.
That's all! Now you will open the application and enjoy developing my project.